

This post is cowritten with Aashraya Sachdeva from Observe.ai.
You can use Amazon SageMaker to build, train and deploy machine learning (ML) models, including large language models (LLMs) and other foundation models (FMs). This helps you significantly reduce the time required for a range of generative AI and ML development tasks. An AI/ML development cycle typically involves data pre-processing, model development, training, testing and deployment lifecycles. By using SageMaker, your data science and ML engineering teams can offload a lot of the undifferentiated heavy lifting involved with model development.
While SageMaker can help teams offload a lot of heavy lifting, engineering teams still have to use manual steps to implement and fine-tune related services that are part of inference pipelines, such as queues and databases. In addition, teams have to test multiple GPU instance types to find the right balance between performance and cost.
Observe.ai provides a Conversation Intelligence (CI) product that integrates with contact center as a service (CCaaS) solutions. The tool analyzes calls in real time and after they’re complete to enable features such as call summarizations, agent feedback, and auto response . The Conversation Intelligence (CI) features need to scale from customers that have fewer than 100 agents to customers that have thousands of agents—a tenfold increase in scale. To help with this, Observe.ai needed a mechanism to optimize their ML infrastructure and model serving costs. Without such a mechanism, developers had to write multiple test scripts and develop testing pipelines and debugging systems, which consumed a lot of time.
To solve this challenge, Observe.ai developed the One Load Audit Framework (OLAF), which integrates with SageMaker to identify bottlenecks and performance issues in ML services, offering latency and throughput measurements under both static and dynamic data loads. The framework also seamlessly incorporates ML performance testing into the software development lifecycle, facilitating accurate provisioning and cost savings. Using OLAF, Observe.AI’s ML team was able to reduce testing time from a week to a few hours. This helped Observe.AI scale up their frequency of endpoint deployment and customer onboarding multifold. The OLAF utility is available on GitHub and is free to use. It is open source and distributed under the Apache 2.0 license.
In this blog post, you will learn how to use the OLAF utility to test and validate your SageMaker endpoint.
Solution overview
After you’ve deployed your model for inference and verified that it’s functionally accurate, you’ll want to improve the performance of your model. The first step to do this is to load test the inference endpoint. You can use the load test metrics to apply optimizations to your model, decide on GPU instances, and fine tune the ML pipeline to increase performance without compromising on accuracy. Load testing needs to be repeated multiple times to measure the impact of any optimization. To load test, you need to configure load testing scripts to integrate with the relevant SageMaker APIs, extract metrics like latency, CPU, and memory utilization. You also need to set up a dashboard to view the results of the load test and, export the load test metrics for further analysis; and you need a configurable framework to apply concurrent load to the endpoint.
How OLAF helps
OLAF saves you the heavy lifting by providing the preceding elements as a package. OLAF is integrated with Locust, a load testing framework, to provide the capability to create concurrent load and a dashboard to view the results as the test progresses. OLAF integrates with the SageMaker API to invoke the API and to extract the metrics to measure the performance by.
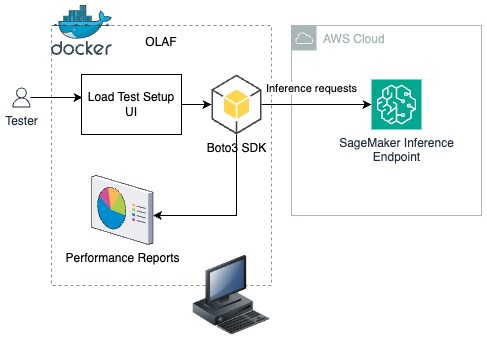
In the following solution, you will learn how to deploy OLAF on your workstation as a Docker container. Using the Load test setup UI (as shown in the following figure), the load test configuration is provided and the OLAF framework uses the Boto3 SDK to push inference requests to a SageMaker inference endpoint. OLAF monitors the latency and available performance metrics using the Performance reports dashboard provided by OLAF.
Prerequisites
For this solution walkthrough, you need the following:
- An AWS account
- Docker installed on your workstation
- The AWS Command Line Interface (AWS CLI) installed and configured. If you’re using long term credentials such as access keys, see manage access keys for IAM users and secure access keys for best practices. This post uses temporary short term credentials generated by the AWS Security Token Service (AWS STS).
Generate your AWS credentials using AWS STS
To get started, use the AWS CLI to generate your credentials.
Note: Ensure that the role or user from which the access keys are generated has AmazonSageMakerFullAccess permission. Your AWS CLI role should have the necessary trust policy to assume the role from which the access keys are generated.
Getting the role-arn
In your AWS CLI type in the following command:
The command will generate the JSON output below. The role arn is the value in the arn property in the JSON below.
Run the following command in your AWS CLI:
Set the role arn value from the step above in the –role-arn argument.
Provide the value olaf_session to the —role-session-name argument and set a value equivalent to how long you expect your load test to run in the –duration-seconds argument. In this blog we are setting it at 1800 seconds which give 30 minutes of load testing time.
- The assume-role command will generate temporary AWS credentials as below
- Make a note of the access key, secret key, and session token, which you will use to configure the test in the OLAF tool.
Set up your SageMaker inference endpoint
In this step, you set up a SageMaker inference endpoint. The following is a CloudFormation script to set up the endpoint. Copy the content below and save it as a yaml file for use in the steps below.
- Open an AWS CloudShell window by selecting the CloudShell icon at the top of the AWS Management Console in the AWS Region where you want the endpoint to be created.
![]()
- In your CloudShell window, choose Actions and select Upload file. Select and upload the CloudFormation YAML file shared at the start of this section.
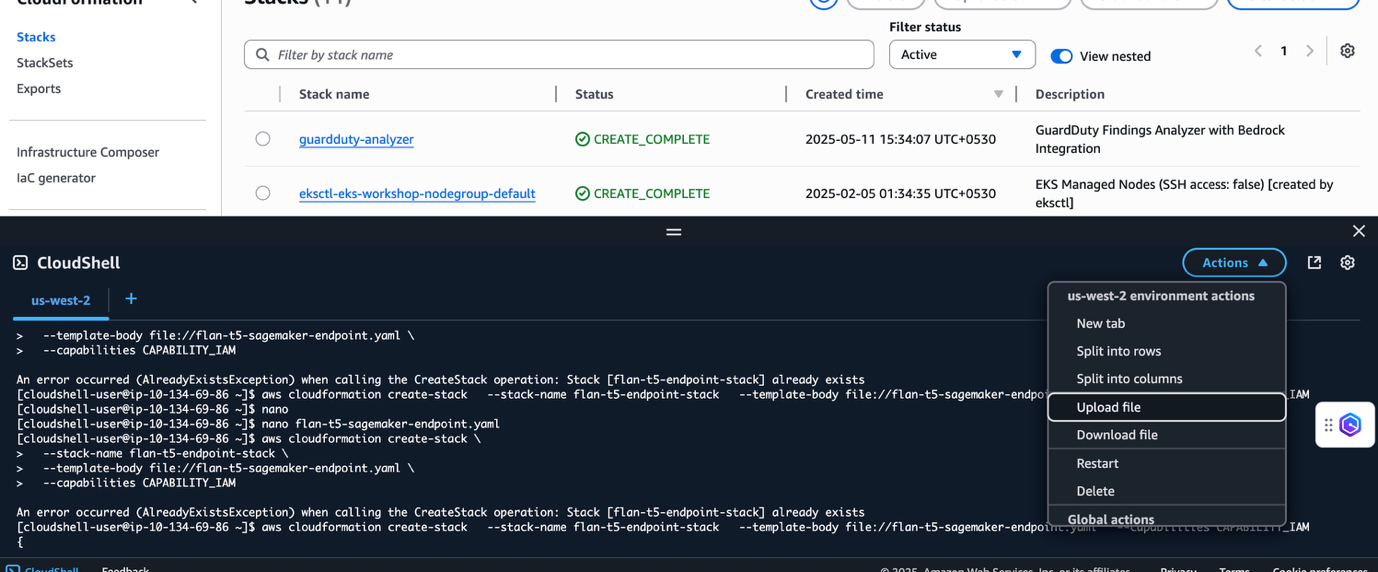
- Run the following command at the CloudShell prompt
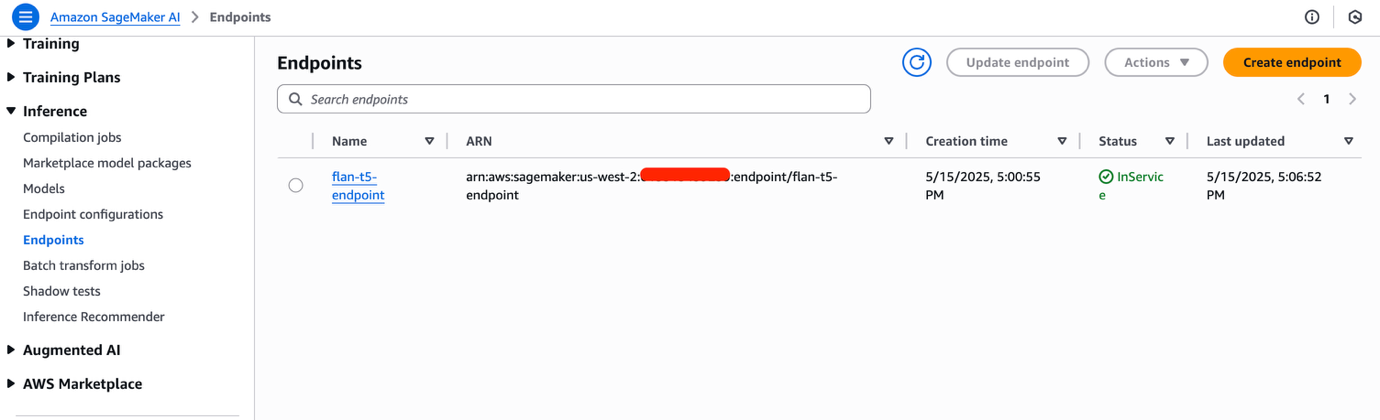
- Navigate to the Amazon SageMaker AI Studio console. You might need to change the Region to match where you have deployed your SageMaker endpoint. Select the Inference and then Endpoints in the navigation pane to view the deployed endpoint. The SageMaker endpoint will take a few minutes to complete provisioning. When ready the value of the Status field will be InService. Note the endpoint name.
Install OLAF
You’re ready to install and configure OLAF to help you load test your SageMaker AI inference endpoint.
- Clone the OLAF repository from the OLAF GitHub repo:
- Navigate to the
olafdirectory and build the docker image for OLAF:
- Run OLAF:
- Open a browser window and enter the following URL to bring up the OLAF UI.
- Enter
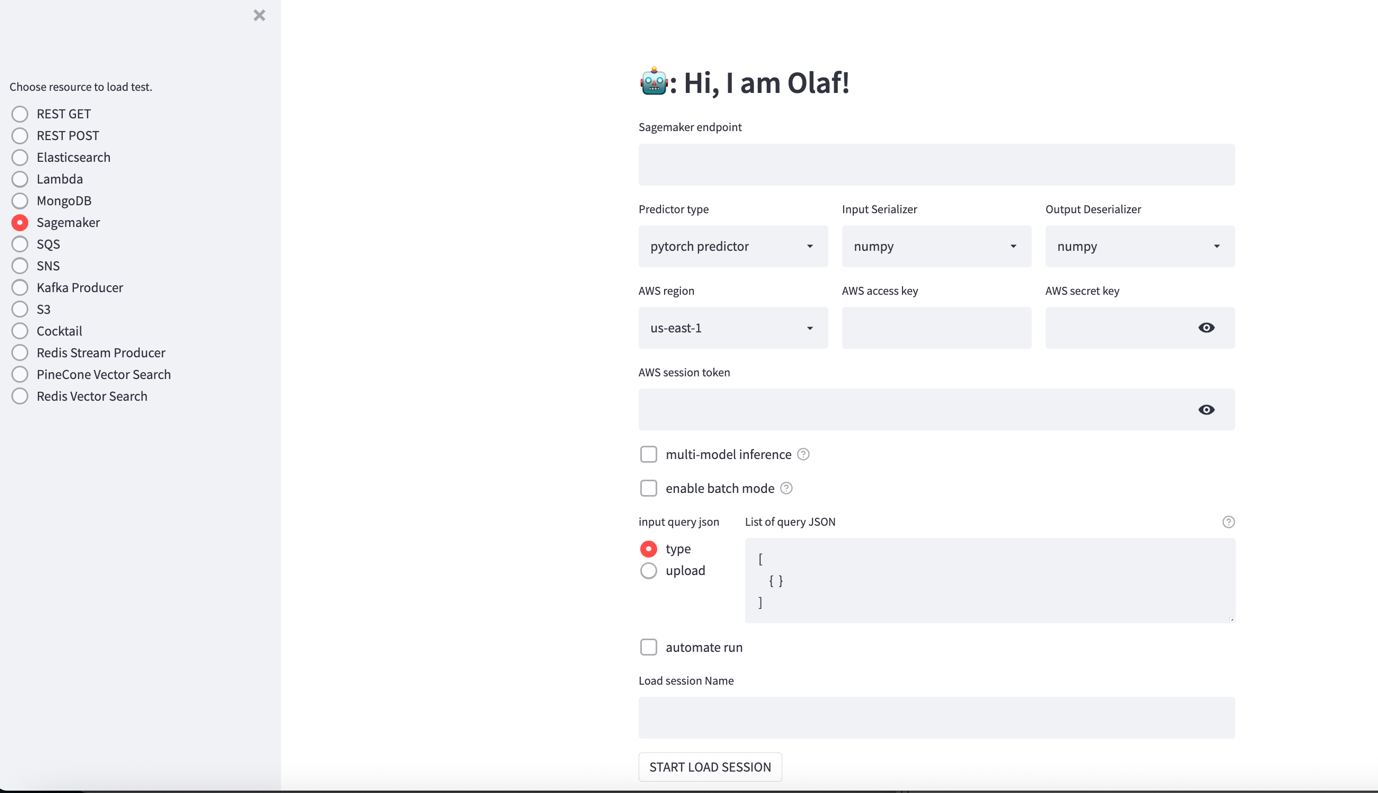
olafas the username and password to sign in to the OLAF dashboard. On the left is a series of radio buttons to select the resource to be tested, including SageMaker, S3, and so on. On the right is a setup screen that changes based on the resource selected.
OLAF supports additional options, including:
- Multi-model
- Enable batch mode
Test the SageMaker endpoint
- Open the OLAF UI at http://localhost:80/.
- Select Sagemaker from the navigation pane and configure the test:
- SageMaker endpoint– Enter the name of the SageMaker endpoint from the SageMaker Unified Studio console here.
- Predictor type – OLAF supports pytorch, sklearn and tensorflow predictors. Keep the default values.
- Input Serializer – Serialization options are numpy and json. Keep the default values.
- Output Serializer – Serialization options are numpy and json. Keep the default values.
- AWS Region – Select the Region where the SageMaker endpoint is deployed
- AWS access key – Enter the AWS access key generated from AWS STS in the section “Generate your AWS credentials using AWS STS” above.
- AWS secret key – Enter the AWS secret key generated from AWS STS in the section “Generate your AWS credentials using AWS STS” above.
- AWS session token – Enter the session token generated from AWS STS in the section “Generate your AWS credentials using AWS STS” above.
- Input query json – For this test, enter the following prompt to translate a phrase from English to French.
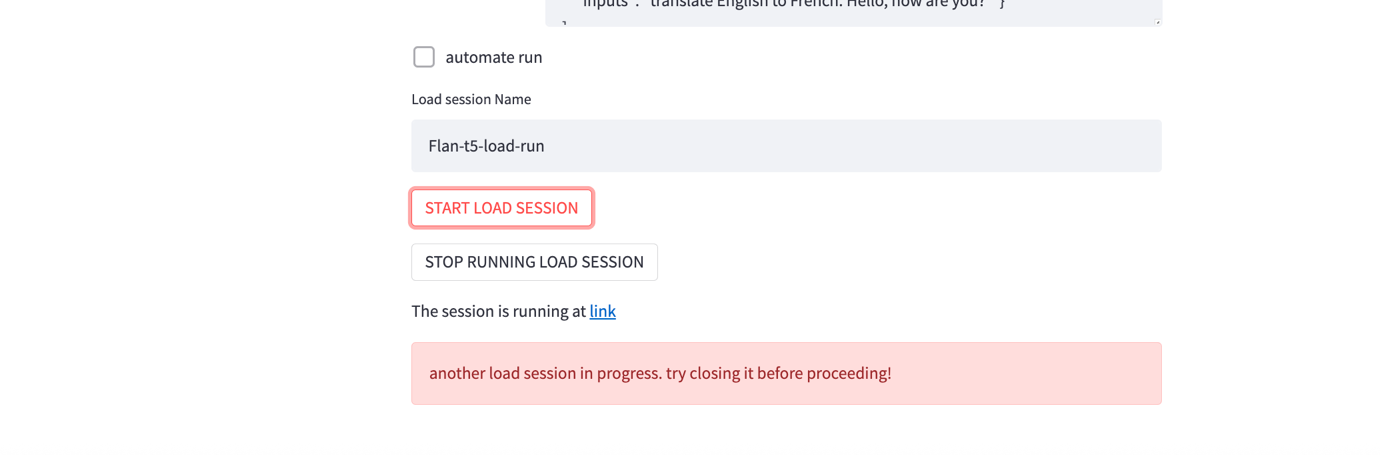
- Choose START LOAD SESSION to start a load test session. The session is started and a link to the session is provided at the bottom of the page. If the link doesn’t appear in a few seconds choose START LOAD SESSION to generate the link to the session.

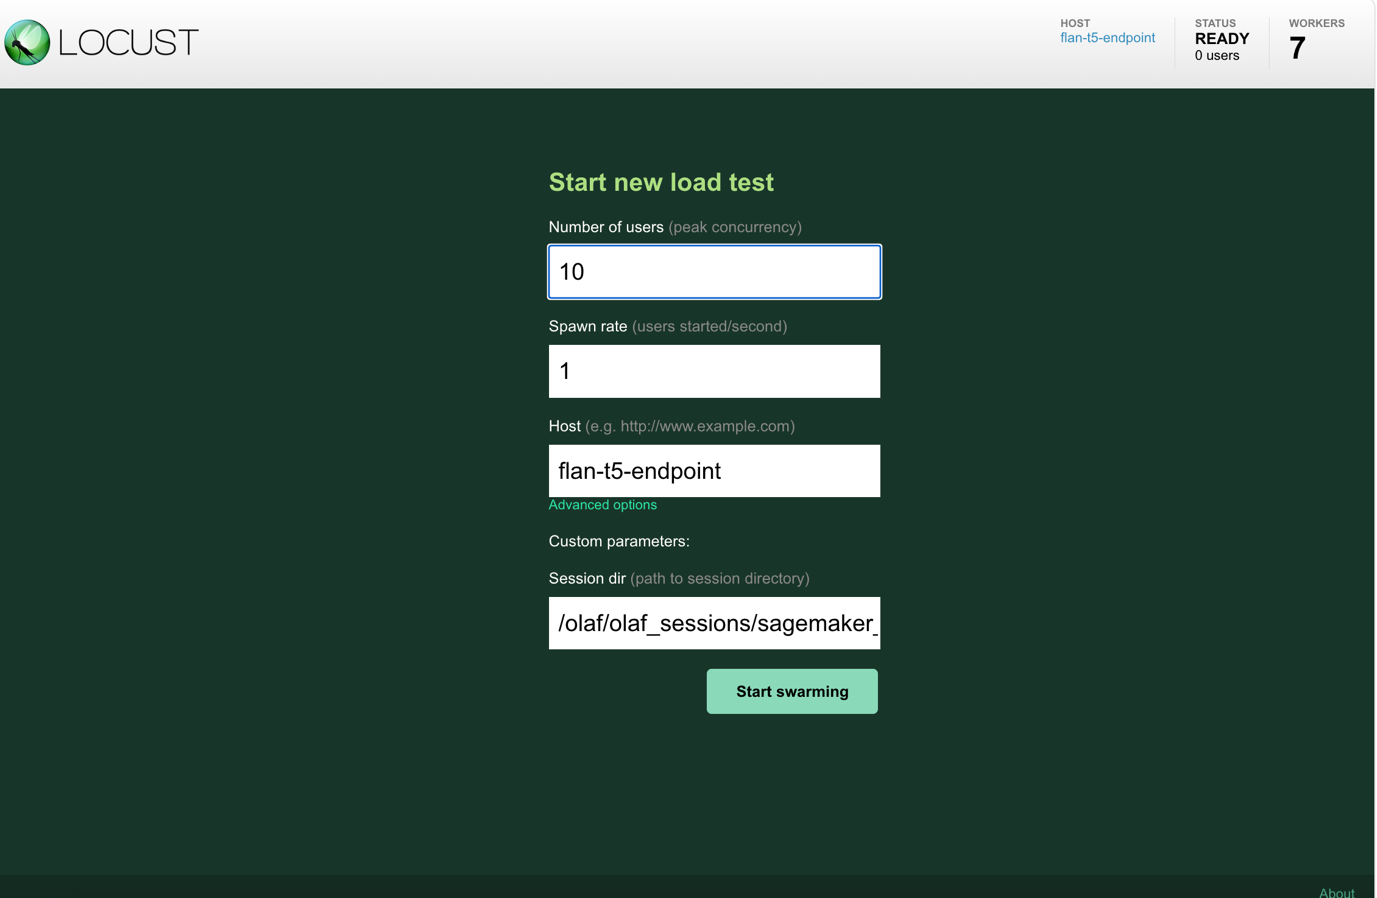
- Selecting the link takes you to a LOCUST dashboard. Enter the number of concurrent users that you want the test to simulate in the Number of users field and the interval (in seconds) that the users must be started in the spawn rate. Choose Start swarming to start the load test.
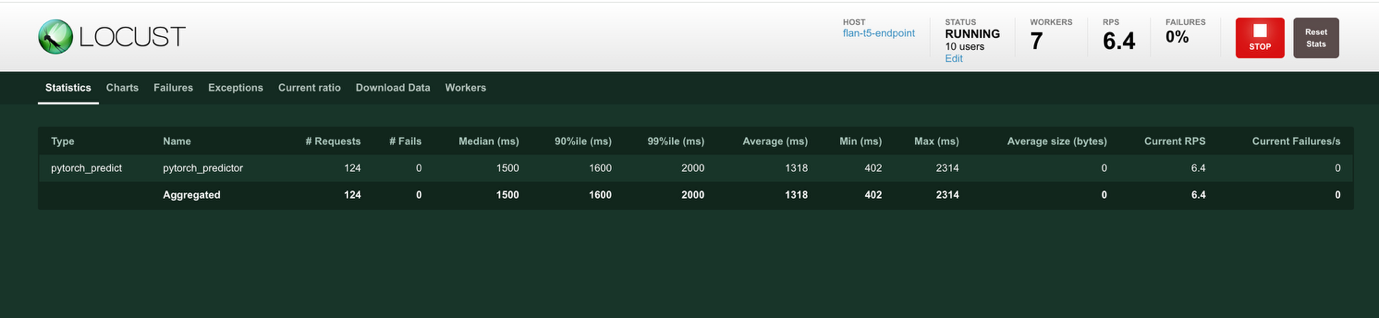
- On starting the test, a reporting page, shown in the following figure, is presented that you can use to monitor the various performance parameters as the test proceeds. The information on this page provides a summary of the statistics, the p50 and p95 latency values, and the CPU and memory usage of the SageMaker workers.
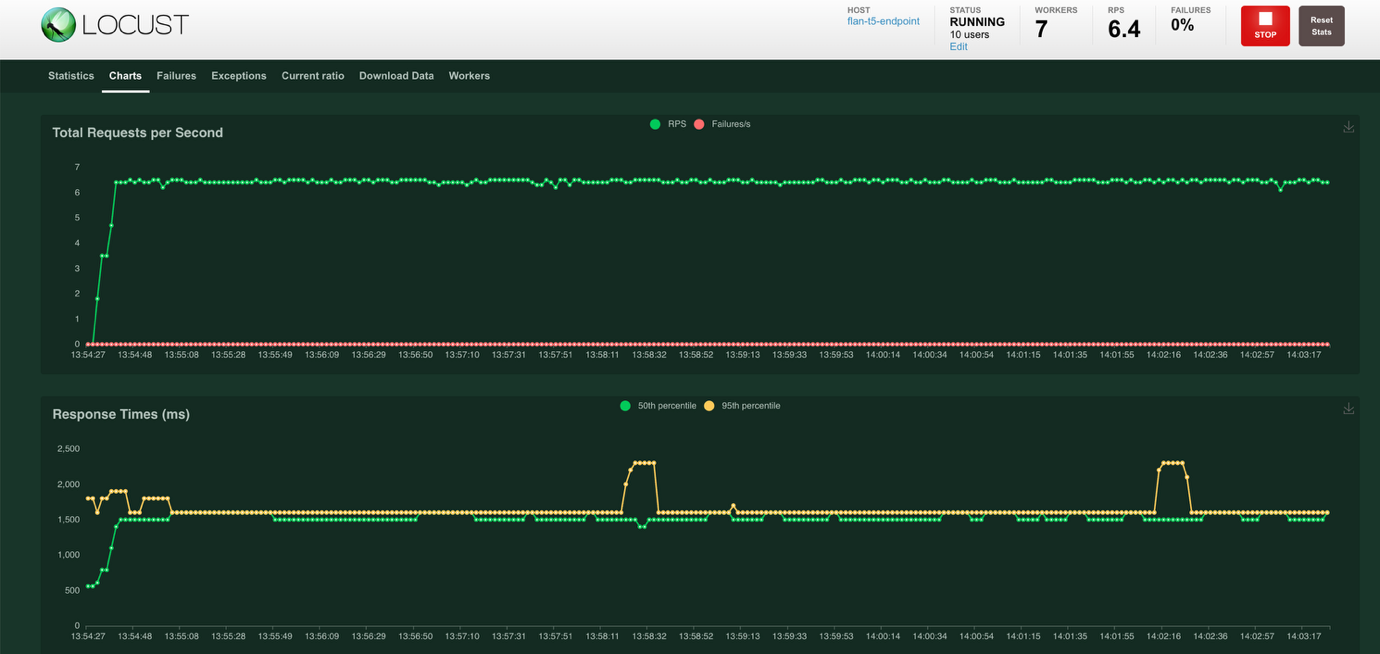
- Choose Charts at the top of the screen to view charts that show the Total Requests per Second and the Response Times in milliseconds. The Total Requests per Second chart shows the successful requests in green and the failed requests in red. The Response Times chart shows the fiftieth percentile response times in green and the ninety-fifth percentile response times in yellow.
- Choose Workers at the top of the screen to view the worker statistics. Workers are created to generate the desired load. The # users show the number of users generated by the worker, the CPU usage and Memory Usage show the resource utilization by the worker.

- You can view and download the final statistics for analysis. Choose Download Data at the top of the screen to view data download options. You can download the data as a CSV file from the Statistics, Failures, Exceptions, and Charts reporting pages.

- You must stop the current load session before you can execute a new session. Choose the STOP RUNNING LOAD SESSION to stop the session. If configured, the data can be uploaded into a specified Amazon Simple Storage Service (Amazon S3) bucket. Follow the instructions in Advanced OLAF Usage item 3, Automated Backup of Load Test Report, to configure the upload of test results to Amazon S3.
Hosting the client
For the solution described in this post, you used a desktop to host the OLAF container and set up the load tests. The choice of using your desktop or an Amazon Elastic Compute Cloude (Amazon EC2) instance can impact the latency because the round trip time will be impacted. Network bandwidth can also impact the latency. The key is to standardize the environment that you use to run the tests based on how your customers use the endpoints.
Clean up
When you’re done with this demonstration, remove any resources that you no longer need to avoid incurring future costs.
- In the CloudShell terminal run the following command to delete the SageMaker endpoint:
- Run the following command to list the running Docker images
- Note the
container_idand then run the following command to stop the Docker images.
Conclusion
In this post, you’ve learned how to set up OLAF and use it to load test a SageMaker endpoint with a few basic steps. OLAF represents a significant step forward in streamlining the optimization of ML infrastructure and model serving costs. Through this demonstration, you’ve seen how OLAF seamlessly integrates with SageMaker to provide valuable insights into endpoint performance under various load conditions. Key benefits of OLAF include:
- Straightforward setup and integration with existing SageMaker endpoints
- Real-time monitoring of performance metrics including latency and throughput
- Detailed statistics and downloadable reports for analysis
- Ability to test different load patterns and concurrency levels
- Support for multiple model types and serialization options
For organizations like Observe.ai that need to scale their ML operations efficiently, OLAF eliminates the need to develop custom testing infrastructure and debugging systems. This means that development teams can focus on their core product features while ensuring optimal performance and cost-effectiveness of their ML infrastructure. As the adoption of ML continues to grow, tools like OLAF become increasingly valuable in helping organizations optimize their ML operations. Whether you’re running a few models or managing a large-scale ML infrastructure, OLAF provides the insights needed to make informed decisions about instance types, scaling, and resource allocation.
In this sample solution, you used short term credentials generated by the AWS STS service to connect to SageMaker from OLAF. Ensure that the necessary steps are taken to secure your access keys and credentials in a production environment.
To get started with OLAF, visit the GitHub repository and follow the installation steps outlined in this post. The framework’s intuitive interface and comprehensive monitoring capabilities make it an essential tool for organizations that want to optimize their SageMaker deployments.
About the authors
 Aashraya Sachdeva is a technology leader with deep expertise in genAI, product development, and platform engineering. As the Director of Engineering at Observe, he oversees teams building scalable, agentic solutions that enhance both customer experience and operational efficiency. With extensive experience guiding ML initiatives from early data exploration through deployment and large-scale operations, he brings a pragmatic, reliability-focused approach to delivering high-performing platforms. Throughout his career, he has played a key role in launching multiple products, leveraging his ML background to create innovative yet practical solutions, while consistently fostering collaboration, mentorship, and technical excellence across engineering teams.
 Shibu Jacob is a Senior Solutions Architect at Amazon Web Services (AWS), where he helps customers architect and implement cloud-native solutions. With over two decades of experience in software development and architecture, Shibu specializes in containerization, microservices, and event-driven architectures. He is particularly passionate about the transformative potential of AI in software development and architectural design. Prior to joining AWS, he spent 20 years working with enterprises and startups, bringing a wealth of practical experience to his current role. Outside of work, Shibu enjoys following Formula 1 racing, working on DIY automotive projects, going on long road trips, and spending time with his family.


